

 ChatGPT
 Claude
 Grok
Grok
 Perplexity
 Gemini
Writing a check is one of the forms of money transfer from one person or organization to another. Checks are a popular form of money exchange, with billions transacted through checks. Recent reports state that Americans had written more than 14.5 billion checks worth 25.8 trillion dollars. This report clearly illustrates how checks are a part of daily life in America, and knowing how to write a check correctly is essential. By the end of this guide, you will be able to understand the various steps involved in writing a check and will be able to write your check in no time!
Click Here For Interactive Demo ⬇
Online Check Writer
Key figures
1M+
online business accounts
88B+
transaction volume
16M+
checks processed
Steps:
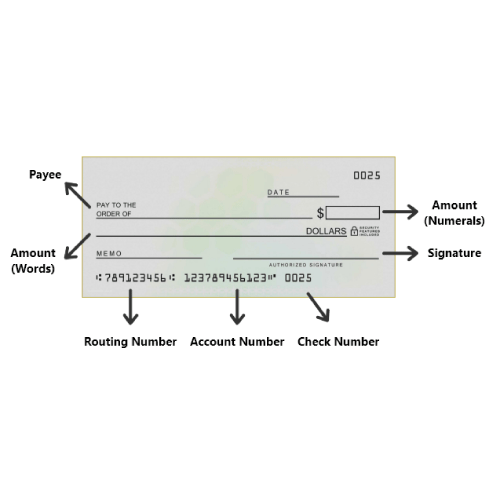
1. Fill the date
There is space provided in the top–right corner of the check to write the date. Writing the date helps you, your bank, and your recipient keep a proper financial transaction record.
2. Pay to the order of
This is an important column that specifies who the payment is for. This column should be filled with either the intended recipient’s name or the letters “cash” if you intend to conduct a cash withdrawal from your account. Filling cash in the column could be risky as if you lose the check, there is a chance that someone might misuse it.
3. Amount Box
In this box, right below the date column, you must write the amount you wish to transfer to your recipient. You must be careful to start filling the column from as far left as you can so that people can avoid sneaking in numbers in between or before. Also, the decimal points must be specified to close the figure. Example 100.50
4. Amount Line
In these lines, you must write the amount being transacted in words. This helps avoid any fraud or confusion, and it bears more legal weight than the number written in the amount box. After filling the amount, you must draw a long line across the rest of the blank space to prevent anyone from writing more.
5. Memo
The memo line is optional and now affects how the check is processed. It can be used to fill in what the check is for; this might be useful for tax filing and returns. For example, in a check written for a charity, you can fill out the memo line for the same.
6. Signature
This is an essential step in writing a check, as a check will not be valid without a signature. The sign has to be legible and in the bottom right corner of the check. The signature should be the same as you have provided at the bank.
FAQ
How to write a void check?
You can write a void check either by writing VOID in large letters across the check or fill all columns with the word “void.” Note that a void check can no longer be used for transactions.
Can I write a check to myself?
You can write a check to yourself by filling in the payee name as Cash and withdrawing money from the bank.
How to write a check with cents?
You can write a check with cents by filling in the number of cents after a decimal point in the amount box and write down the same in the amount column in words.